Showing posts with label furniture. Show all posts

Wednesday, June 27, 2012

Clock Face Table Makeover

I've been bored with our plain black pedestal table for awhile,
but didn't want to go out and buy a new one (of course!).
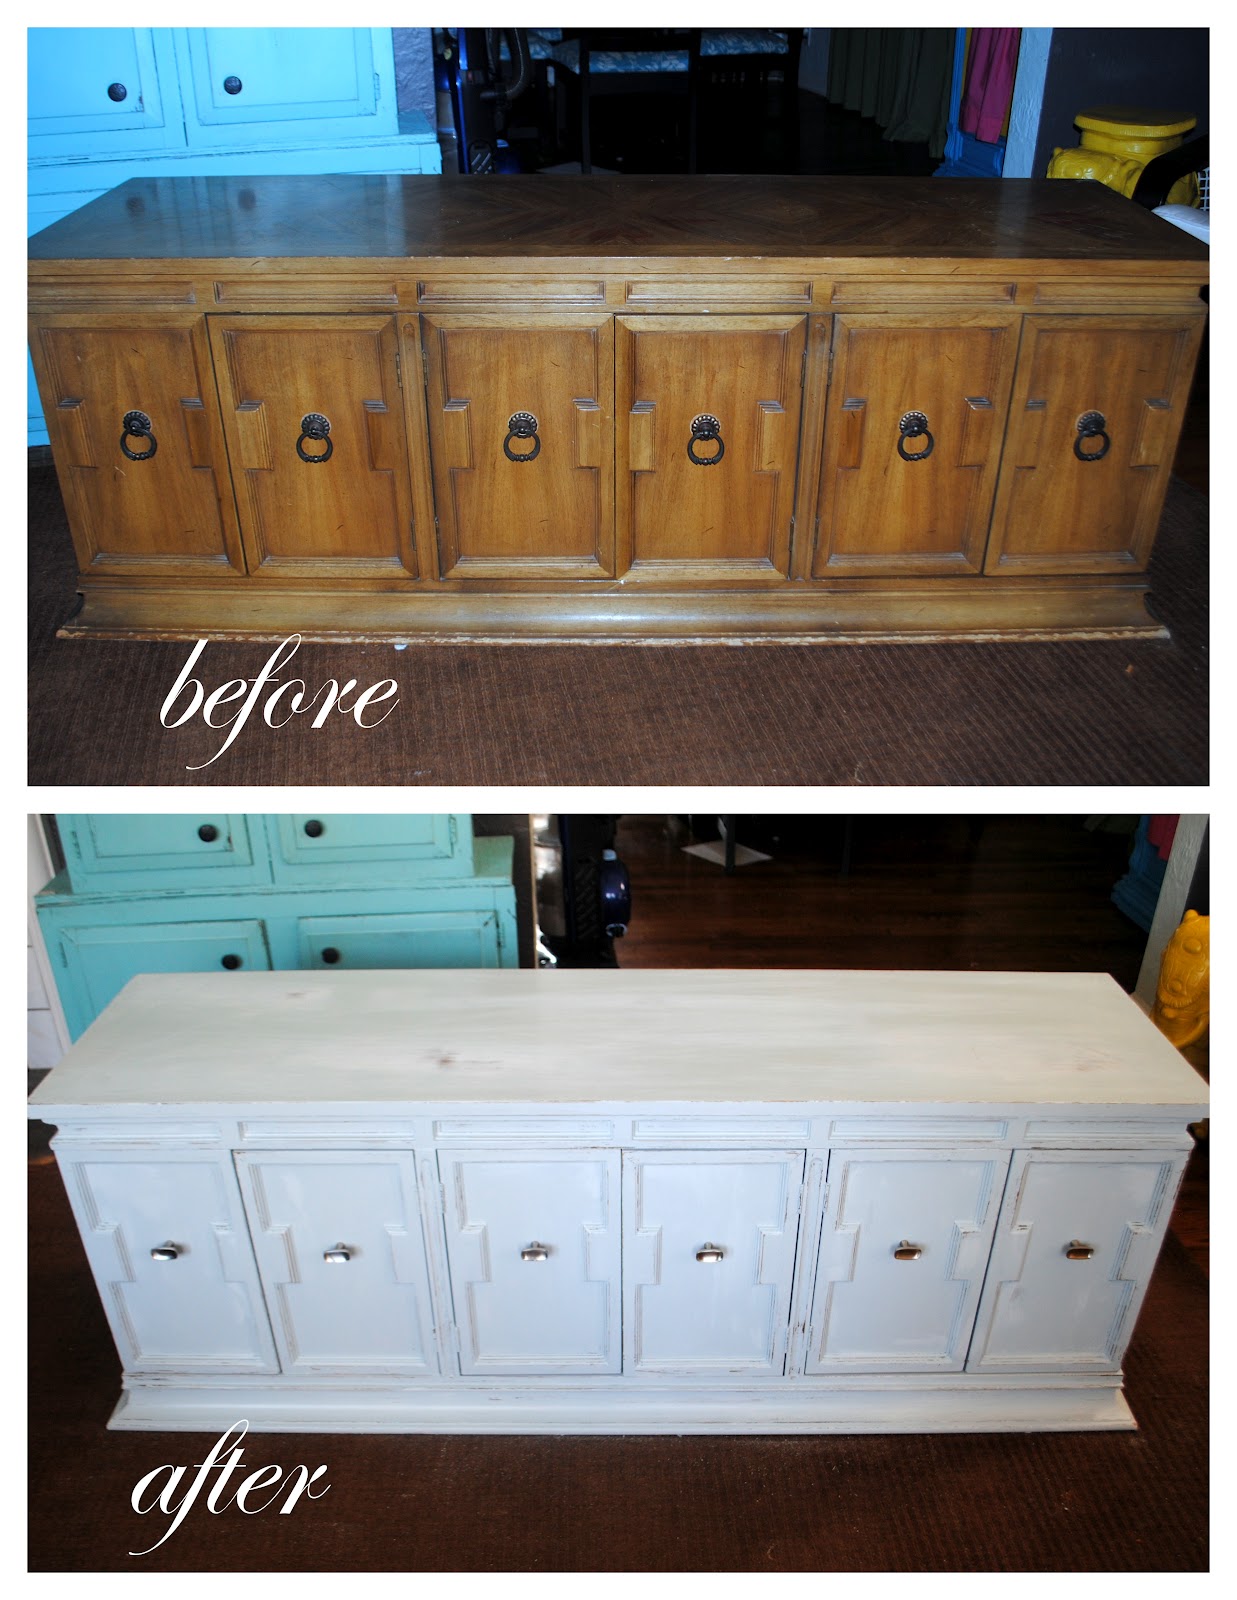
While we were driving home from a friend's house, we found this table on the curb for the trash.
Can you believe that? Who would just throw away such a beautiful table??
It took a lot of convincing, but I finally got my husband to help me put it into our SUV... with two car seats and golf clubs in the back. ;) it was a verrry uncomfortable ride home, but so worth it!
This is my sister's watch- which I love. It's classic and big. BIGGER is better!
I decided to use real numbers instead of the roman numerals to modernize it a little.
 The table had been left out in the rain so the top was slightly warped. I sanded it down and then applied some wood filler. After about 8 hours of dry time, I sanded it again. Lots of sanding. I didn't want a perfectly smooth finish, because I planned on glazing and needed some hangup spots.
After wiping down the excess wood filler, I applied a coat of grey primer and then a coat of white primer. You can see the grey through the white, which I liked. We're going for an aged look here, so after those dried I rubbed more grey primer all over with a cloth and then wiped it off. It hung up in some of the recesses and made the table look aged.

Next, I found the middle of the table and stuck a pushpin in. After tying a string to it and the other end to a pencil, I was able to start drawing circles around the table. This made it easy to figure out where the numbers would go.
 Here's a close up of my pencil lines. I actually left them on because I liked the way that they looked.
I found some awesome number graphics from the Graphics Fairy and printed them up as large as I could- one per page. They're not exact but pretty close. :) I used the two circles that I drew as a guideline and tried to keep the numbers in between them.
After tracing the numbers in pencil onto the table, we're ready to paint!
In this picture, you can really see the glazing and aging effect.
 Starting to paint... and you can see where I had to re-trace the 11. It was a little crooked the first time.
 I added the little minute dashes after the numbers- and outlined one of the original circles.


 Well, at least someone likes the new table around here!


Tuesday, May 8, 2012

white Bookshelf Makeover with Removable Lining

This black, beat up bookshelf of ours has been screaming for a makeover for awhile now. However, like with most things, I couldn't decide which color to paint it. I really didn't want to have to paint it my usual three times before I like it. So, I went with the classic white and to add a some pop of color to my gray dining area, I put wrapping paper on thick poster board for lining. That way when I change my mind, I can just unwrap the poster board and put a new color on or leave it white.
Did I say, I put the wrapping paper on??? Oh yes, my sweet mom did it for me while I laid on the couch, sick and wanting to throw up (these was about a year ago when we found out about our upcoming surprise baby). Not only did my parents fly into town to help my kids and me while I was sick, my mom finished all my craft projects and my dad fixed EVERYTHING around the house and still managed to do a puzzle:)
I saw this wrapping paper at Target on clearance!!! So much cheaper than using fabric which was my original plan.

Well, that surprise baby is now 3 months old and this bookshelf is finally finished!!!! Some projects just take me A LOOOONG time. I LOVE the clean, fresh look of it!
Photobucket

Friday, March 30, 2012

Fave Furniture Fridays #3


Helloooooo! Happy Friday! I've brought you a tutorial today by the lovely Cerniks and their blog. Click on the picture below to check out how they bought a table for $20 on craigslist and transformed it. I LOVE  before and afters- and they show you how to do it and what to use.

 Here is a chair that I finished this week. It's going to take a special person to buy this chair! I wanted to use some fuschia velvet that I had, and it really pops with the aqua! The before? Too horrible to show. ;)
 And another... this one had a pleather seat that I just covered over. Usually I remove the old upholstery, but this one was kindof...nice to sit on. That's the whole point, right? This grey and yellow floral fabric is an apparel fabric so I pulled it tight and sprayed it with scotchguard. It's a staple at our house!
 THIS chair... was my favorite. it's certainly from the archives and long gone, but I loved the green color and the white seat. I think at the next house, I'm going to paint my dining room that green! :)

...and some barstools that I found for $5 and repainted. I sold these on craigslist after a few YEARS of using them.. and the person who bought had no correlation with the letter R. funny!
I leave you with an incredible quote that I found on Pinterest!
If you're as pinterest addicted as I am, you can find me here. :)

Do you have a great project that you've been working on?? Link up! We would love to show you off!
Have a great week!

Friday, March 23, 2012

Fave Furniture Fridays...#2

Hello blog world.. and welcome to the second edition of Fave Furniture Fridays!
 (or, as Telisa and i have started calling it- "FFF")
Thanks so much for your links last week- it was fun checking each one out. The link with the most clicks was actually Telisa's- her armoire makeover was stunning, and you can see why!

I've been busy this week with a few projects of my own. I'm a big big fan of turning "trash to treasure", and the cheaper I can get a piece of furniture, the better the treasure it makes.
(when someone puts it on the curb, even BETTER!)
I usually redo about 2-3 pieces a week, and it's gotten a little crowded in our house- most of the pieces are either sold on craigslist or given to friends now. It's such a fun hobby!
Did i mention a little crowded in our house? I meant a lot.

This chair was one that i found at goodwill for three dollars.
This is a record console (it has vertical dividers in each section of double doors) that i found on the curb. WHO would throw this away??? not i. (also, I passed up an old organ because i couldn't think of anything fun do with it. It looked like a piano, but had a few rows of keys. thoughts??) I lightly sanded it, primed and painted it a gorgeous blue-grey, distressed it and changed out the knobs.
These end tables came with the chevron coffee table (here) that I beautified a few weeks ago. No before picture, but just imagine... dark wood. dangley handles. yuck.

I like chairs. Here's another one with a FABULOUS back design. So retro! I painted it grey and had to create a seat for it because the one that was on it crumbled in my hands as i unscrewed it. ewww.
After buying some new foam, i covered the seat in a pretty yellow corduroy with wide stripes. :)
Show some love- link up at our weekly party today and don't miss another one! Fill in your email address on the right sidebar to keep current! (hint, hint. g-i-v-e-a-w-a-y soon)
*Link-up your post (not your main URL) to this party, then include a link back to this page  
*No Etsy pages or business websites please.
 *Include a short description of your project and the name
of your blog in your link up.
   * Visit at least 2 other blog links and show them some love!
  *Grab the party-link button on the left side bar so others can join the PARTY!


Friday, March 16, 2012

New Series: Fave Furniture Fridays!

Welp, it's about time for a series around here.. and what else but my favorite things?
Yippee! Furniture!
I'll be posting every friday with my latest and greatest finds. Tutorials, DIY, paint, all kinds of fun stuff!
Link up your fave furniture transformations, tutorials and great finds, too!
I'll post the most popular the next week.


This first piece was found at kitchy living, and it's a doozie! (is that a word?) 
I love that it's a traditional piece that is painted an unexpected color. You would EXPECT this vanity/desk to be dark brown wood, right?
 
This chandelier... blows my mind. Absolutely Gorgeous. Found it at JamesPlumb.
This is an incredible transformation. Who would think to cut out the top section of a dresser and use it as a bench?? Chic Staging and Design would. That's who.
Can I post my own furniture makeover?
Yep. I'm doing it.
I turned a console TV into a fort. Check out the post here!

I've used this tutorial many, many times. How to paint letters perfectly on wood. Genius!
How to paint laminate. That's right. IT CAN BE DONE!!! I found this tutorial by CentsationalGirl, and it's awesome. She even recommends sanding down the drips after priming and before your two coats of paint.phew! A lot of work, but so worth it!
Okay, so party rules?? You've gotta have 'em.
(thanks to NightOwlCrafting for the rules, because I had no idea.)
*Link-up your post (not your main URL) to this party, then include a link back to this page  
*No Etsy pages or business websites please.
 *Include a short description of your project and the name
of your blog in your link up.
   * Visit at least 2 other blog links and show them some love!
  *Grab the party-link button on the side bar so others can join the PARTY!
(looking for the link button? look no further.  It'll be up next week!)
I can't wait to see what you SugarTots find! ;)


Related Posts Plugin for WordPress, Blogger...